Sync your EZLynx policy data into Better Agency
If you are using EZLynx as your AMS, consider moving to Better Agency's AMS to simplify your tech stack, reduce costs, and get back to running your agency more efficiently.
Need to stay on EZLynx? You can setup this daily batch sync to update policy information from EZLynx into Better Agency, to reduce dual data entry on policy updates.
Overview
There are two parts to setup the sync. First, you will schedule a daily Policy Transactions report in EZLynx that is emailed to Better Agency. Second, you will enable and configure the sync in Better Agency.
Once setup, the sync process runs every morning and processes the policy updates from the report to update your policies in Better Agency the following day.
Use Cases
Enabling the sync allows you to run new client campaigns and service request/cancelation campaigns, for example, based on policy updates from EZLynx.
Following is the complete list of policy updates that can be synced from EZLynx into Better Agency, and how they are processed:
- Cancel Request - Creates a task and new service request in Better Agency.
- Cancel Confirmed - Moves the service request to Completed, does not automatically start the closed service request campaign. Creates task to allow user to start the winback campaign.
- New Business - If contact has an active Opportunity for this policy in the Sales Pipeline, it will move the opportunity to "Won". Will create a task for the assigned agent to select a cross-sell campaign and "disposition" the policy in the Sales Pipeline to confirm information is correct.
-
Policy change - Updates policy information.
- Re-issue - Reactivates a cancelled policy. Treats as renewal business for commission purposes.
- Reinstate - Reactivates a cancelled policy. Treats as renewal business for commission purposes.
- Renew Quote - Adds note to renewal opportunity.
-
Renewal - Updates this policy in Renewal Pipeline to complete.
- Renewal Requote - Adds note to renewal opportunity.
Additional Notes
-
The unique identifier from the EZLynx Report to Better Agency is policy number.
-
When closing new business, we recommend producers still update opportunities to "Won" in Better Agency, to indicate your preferred cross-sell campaign.
- If your New Client Welcome campaign is enabled, it will run when you move the opportunity to "Won", and will not re-run when the sync occurs.
- The sync only updates policies, it does not update contacts or companies.
Setup - Part 1
Login to Your EZLynx account and complete the following:
1. On your Dashboard, first hover over your "Reports Icon" and then select "Policy Management"

2. Select the report "Policy Transaction Detail"

3. Next, you will want to turn off a few items for the report.
Click on drop down "Transaction Type" and uncheck the following items:
-
DB Sync
-
Other
4. After that, click "View Report" and let the report run.

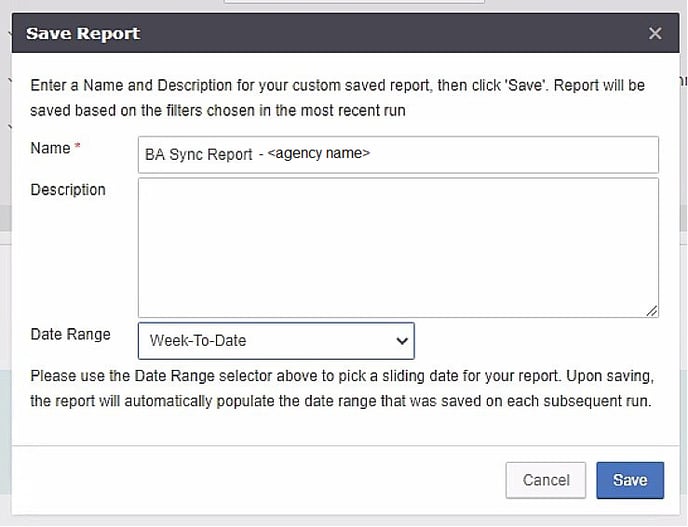
5. A Save Report window will pop up (shown below).
You want to fill it up as:
Name: "BA Sync Report - (Your Agency Name)"
Description: leave blank
Date Range: "Week-To-Date"
And press save.
6. Now that you have saved the report, go back to the main nav and select "All Reports" under the reports icon.

7. Under All Reports, select "Saved Reports"

8. Under "Policy Management" you will find the report you just created.
Once you find it, click the 3 dots of the report, and click "Schedule".

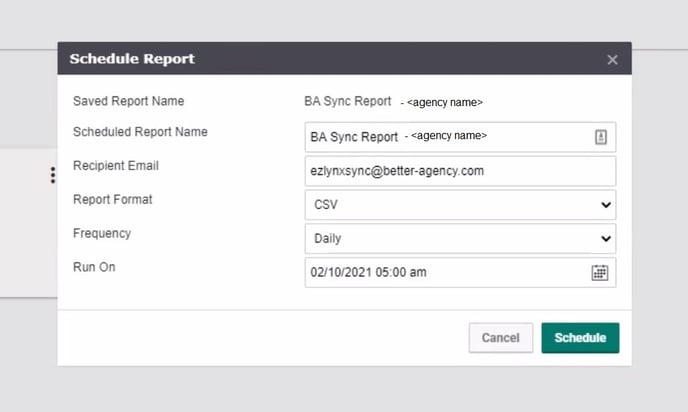
9. A schedule report will pop up. Fill out the selection with the details below:
Scheduled Report Name: BA Sync Report - <Agency Name>
Recipient Email: "ezlynxsync@better-agency.com"
Report Format: CSV
Frequency: Daily
Run On: Select tomorrow's date and set it to run at 7:00am. (That way it will run the report and include all of yesterday's data)
NOTE: This report will now run daily from your EZLynx account. Now you are ready to move on to part two of setup, in Better Agency.
Setup - Part 2
Setup your Integrations settings in Better Agency
Step 1: Login to your Better Agency account and go to Edit Agency.

Step 2: Under the Edit Agency, click the tab "Integrations".

Step 3: Click the "Add Integration" Button and select "Ezlynx" on the drop down field and click Add.


Step 4: On the newly created EZLynx tab, map the corresponding action for each field and click the “Setup Agency Info”. **IMPORTANT** If you do not select an action for each item, nothing will be updated in Better Agency for that type of record update.

Step 5: Input your EZLynx Agency Name** and click Save.

**IMPORTANT**: Agency Name must be exactly the same as your "Branch_Name" from the EZLynx report. The sync will not work if these two fields are not exactly the same.
Please let us know if you have questions by clicking on our support chat tool on the bottom right-hand side of this page!
Did this answer your question?